JavaScript Notes
Build a complete weather application using JavaScript Fetch API and OpenWeatherMap. Step-by-step tutorial with code examples, output blocks, error handling, and DOM manipulation. comprehensive guide for beginners and intermediate developers.
Introduction — What We'll Build
In this project, we'll build a fully functional Weather Application using vanilla JavaScript. The app fetches real-time weather data from the OpenWeatherMap API and displays temperature, humidity, wind speed, and weather conditions with a clean UI.
What you'll learn:
- Making HTTP requests with the Fetch API
- Handling Promises with async/await
- Parsing JSON responses from a REST API
- Dynamic DOM manipulation with template literals
- Input validation and comprehensive error handling
- Event-driven programming with search functionality
Summary: In this project, we will use JavaScript's Fetch API to build a weather app that displays real-time data. This project teaches both API integration and DOM manipulation.
Prerequisites: Basic HTML/CSS knowledge, JavaScript fundamentals (functions, variables, events), and a free OpenWeatherMap API key.
HTML Structure
Create an index.html file with a clean semantic structure:
Key points:
hiddenclass controls visibility (toggled via JS)- Semantic IDs match our JavaScript selectors
- Separate sections for error, loading, and weather display states
CSS Styling (Brief)
* {
  margin: 0;
  padding: 0;
  box-sizing: border-box;
}

body {
  font-family: 'Segoe UI', sans-serif;
  background: linear-gradient(135deg, #667eea 0%, #764ba2 100%);
  min-height: 100vh;
  display: flex;
  justify-content: center;
  align-items: center;
}

.app-container {
  background: white;
  border-radius: 20px;
  padding: 40px;
  width: 400px;
  box-shadow: 0 20px 60px rgba(0, 0, 0, 0.3);
  text-align: center;
}

.search-section {
  display: flex;
  gap: 10px;
  margin: 20px 0;
}

#cityInput {
  flex: 1;
  padding: 12px 16px;
  border: 2px solid #e0e0e0;
  border-radius: 10px;
  font-size: 16px;
  outline: none;
  transition: border-color 0.3s;
}

#cityInput:focus {
  border-color: #667eea;
}

#searchBtn {
  padding: 12px 24px;
  background: #667eea;
  color: white;
  border: none;
  border-radius: 10px;
  cursor: pointer;
  font-size: 16px;
  transition: background 0.3s;
}

#searchBtn:hover {
  background: #5a6fd6;
}

.hidden { display: none; }

.error-msg {
  color: #e74c3c;
  padding: 10px;
  margin: 10px 0;
  background: #fdecea;
  border-radius: 8px;
}

.temperature {
  font-size: 48px;
  font-weight: bold;
  color: #333;
}

.details-grid {
  display: grid;
  grid-template-columns: 1fr 1fr;
  gap: 15px;
  margin-top: 20px;
}

.detail-card {
  background: #f8f9fa;
  padding: 15px;
  border-radius: 10px;
}

.detail-card .label {
  display: block;
  font-size: 12px;
  color: #888;
  text-transform: uppercase;
}

.detail-card .value {
  display: block;
  font-size: 18px;
  font-weight: bold;
  color: #333;
  margin-top: 5px;
}
The CSS uses flexbox and grid for responsive layout. The hidden class is simply display: none — toggled by JavaScript.
JavaScript Implementation (Step by Step)
Step 1: Configuration & DOM References
// ===== CONFIGURATION =====
const API_KEY = 'YOUR_API_KEY_HERE'; // Get free key from openweathermap.org
const BASE_URL = 'https://api.openweathermap.org/data/2.5/weather';

// ===== DOM REFERENCES =====
const cityInput = document.getElementById('cityInput');
const searchBtn = document.getElementById('searchBtn');
const errorMsg = document.getElementById('errorMsg');
const loader = document.getElementById('loader');
const weatherDisplay = document.getElementById('weatherDisplay');
const cityName = document.getElementById('cityName');
const temperature = document.getElementById('temperature');
const description = document.getElementById('description');
const humidity = document.getElementById('humidity');
const windSpeed = document.getElementById('windSpeed');
const feelsLike = document.getElementById('feelsLike');
const pressure = document.getElementById('pressure');
const weatherIcon = document.getElementById('weatherIcon');

console.log('App initialized. DOM references loaded.');
console.log('API Base URL:', BASE_URL);App initialized. DOM references loaded. API Base URL: https://api.openweathermap.org/data/2.5/weather
We store all DOM elements upfront for performance — querying once is better than querying inside every function call.
Step 2: Input Validation Function
{ valid: false, error: 'Please enter a city name.' }
{ valid: false, error: 'City name must be at least 2 characters.' }
{ valid: false, error: 'City name cannot be only numbers.' }
{ valid: true, city: 'New Delhi' }
{ valid: false, error: 'City name contains invalid characters.' }
Note: The validation function checks user input to ensure the city name is valid — empty, too short, or inputs with invalid characters are rejected.
Step 3: Building the API URL
// ===== URL BUILDER =====
function buildWeatherURL(city) {
  const params = new URLSearchParams({
    q: city,
    appid: API_KEY,
    units: 'metric' // Celsius
  });

  const fullURL = `${BASE_URL}?${params.toString()}`;
  return fullURL;
}

// Test URL construction
const testURL = buildWeatherURL('London');
console.log('Generated URL:', testURL);Generated URL: https://api.openweathermap.org/data/2.5/weather?q=London&appid=YOUR_API_KEY_HERE&units=metric
Using URLSearchParams ensures proper encoding of special characters in city names (like spaces becoming %20).
Step 4: Fetching Weather Data (Async/Await)
Response Status: 200
Response OK: true
Weather data received: {
  "coord": { "lon": 72.8777, "lat": 19.0760 },
  "weather": [{ "id": 802, "main": "Clouds", "description": "scattered clouds", "icon": "03d" }],
  "main": { "temp": 32.5, "feels_like": 38.2, "humidity": 70, "pressure": 1006 },
  "wind": { "speed": 5.14 },
  "name": "Mumbai"
}
Key concepts:
await fetch(url)— sends the HTTP GET request and waits for responseresponse.ok—truefor status codes 200-299response.json()— parses the response body as JSON- The try/catch handles both HTTP errors and network failures
Step 5: Parsing JSON Response
Parsed weather: {
  city: 'Delhi',
  country: 'IN',
  temp: 43,
  feelsLike: 45,
  humidity: 25,
  pressure: 1002,
  windSpeed: 3.6,
  description: 'clear sky',
  icon: '01d',
  mainCondition: 'Clear'
}
Delhi: 43°C, clear sky
We extract only what we need from the large API response. Math.round() removes decimals for cleaner display.
Step 6: Displaying Weather in DOM
// ===== RENDER WEATHER TO DOM =====
function displayWeather(weather) {
  // Update text content
  cityName.textContent = `${weather.city}, ${weather.country}`;
  temperature.textContent = `${weather.temp}°C`;
  description.textContent = weather.description.charAt(0).toUpperCase()
    + weather.description.slice(1);
  humidity.textContent = `${weather.humidity}%`;
  windSpeed.textContent = `${weather.windSpeed} m/s`;
  feelsLike.textContent = `${weather.feelsLike}°C`;
  pressure.textContent = `${weather.pressure} hPa`;

  // Set weather icon
  const iconURL = `https://openweathermap.org/img/wn/${weather.icon}@2x.png`;
  weatherIcon.innerHTML = `<img src="${iconURL}" alt="${weather.description}" />`;

  // Show weather display, hide others
  weatherDisplay.classList.remove('hidden');
  errorMsg.classList.add('hidden');
  loader.classList.add('hidden');

  console.log('Weather displayed for:', weather.city);
  console.log('Icon URL:', iconURL);
}

// Simulating render
console.log('displayWeather() ready — updates DOM with parsed data');Weather displayed for: Delhi Icon URL: https://openweathermap.org/img/wn/01d@2x.png displayWeather() ready — updates DOM with parsed data
Note: ThedisplayWeatherfunction injects parsed data into DOM elements usingtextContent— this is safe from XSS attacks because HTML is not interpreted.
Step 7: Error Handling & UI State Management
// ===== UI STATE HELPERS =====
function showError(message) {
  errorMsg.textContent = message;
  errorMsg.classList.remove('hidden');
  weatherDisplay.classList.add('hidden');
  loader.classList.add('hidden');
  console.log('Error shown:', message);
}

function showLoader() {
  loader.classList.remove('hidden');
  errorMsg.classList.add('hidden');
  weatherDisplay.classList.add('hidden');
  console.log('Loader visible — fetching data...');
}

function hideLoader() {
  loader.classList.add('hidden');
  console.log('Loader hidden.');
}

// Test state management
showError('City not found. Please check the spelling.');
showLoader();
hideLoader();Error shown: City not found. Please check the spelling. Loader visible — fetching data... Loader hidden.
Only one state is visible at a time — this prevents confusing UI overlap. The pattern: hide everything first, then show the relevant section.
Step 8: Search Functionality — Connecting Everything
// ===== MAIN SEARCH HANDLER =====
async function handleSearch() {
  const inputValue = cityInput.value;

  // Step 1: Validate
  const validation = validateCity(inputValue);
  if (!validation.valid) {
    showError(validation.error);
    console.log('Validation failed:', validation.error);
    return;
  }

  // Step 2: Show loading state
  showLoader();
  console.log('Searching for:', validation.city);

  // Step 3: Fetch data
  const result = await fetchWeatherData(validation.city);

  // Step 4: Handle result
  if (!result.success) {
    hideLoader();
    showError(result.error);
    console.log('Fetch failed:', result.error);
    return;
  }

  // Step 5: Parse and display
  const weather = parseWeatherData(result.data);
  displayWeather(weather);
  console.log('Search complete for:', weather.city);
}

// ===== EVENT LISTENERS =====
searchBtn.addEventListener('click', handleSearch);

cityInput.addEventListener('keypress', function(event) {
  if (event.key === 'Enter') {
    handleSearch();
  }
});

console.log('Event listeners attached: click + Enter key');Searching for: Mumbai Response Status: 200 Response OK: true Search complete for: Mumbai Event listeners attached: click + Enter key
The handleSearch function orchestrates the entire flow — validate → loading → fetch → parse → display. Each step can exit early on failure.
Complete Code (app.js)
How It Works — Data Flow Diagram
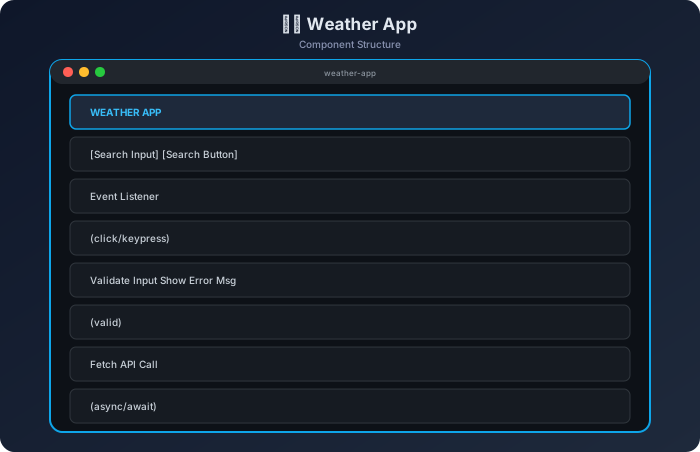
Each function has a single responsibility — this makes the code testable, debuggable, and maintainable.
Key Takeaways
- Fetch API is Promise-based — Use
async/awaitfor readable asynchronous code instead of nested.then()chains.
- Always validate input before making API calls — This saves unnecessary network requests and provides instant feedback to users.
- Handle ALL error scenarios — Network failures, HTTP status codes (404, 401, 429, 500), and malformed responses each need different messages.
- Separate concerns into functions — URL building, fetching, parsing, and rendering should each be their own function.
- Use
textContentoverinnerHTMLfor text — Prevents XSS vulnerabilities when displaying user-provided or API data. Only useinnerHTMLfor trusted HTML like image tags.
URLSearchParamshandles encoding — City names with spaces or special characters are automatically encoded for safe URL construction.
- Show loading states during async operations — Users should always know when data is being fetched. Never leave the UI in an ambiguous state.
- API keys should be protected in production — For learning projects, client-side keys work fine. In production, proxy requests through your backend server to hide the key.
FAQ (Frequently Asked Questions)
Q1: How do I get a free OpenWeatherMap API key?
Go to openweathermap.org, create a free account, and navigate to API Keys in your profile. The free tier allows 60 calls/minute and 1,000,000 calls/month — more than enough for learning projects. The key activates within 10 minutes of creation.
// Replace this with your actual key
const API_KEY = 'abc123def456ghi789'; // 32-character hex string
console.log('Key length check:', API_KEY.length); // Should be 32Key length check: 32
Q2: Why does fetch() not throw errors for 404 or 500 status codes?
The Fetch API only rejects the Promise on network failures (no internet, DNS error, CORS block). HTTP error responses (4xx, 5xx) are still considered "successful" network transactions — you must check response.ok or response.status manually:
const response = await fetch('https://api.openweathermap.org/data/2.5/weather?q=InvalidCity123');
console.log('Promise resolved?', true);       // Yes, it resolves!
console.log('response.ok:', response.ok);      // false (404)
console.log('response.status:', response.status); // 404
// You MUST check .ok yourselfPromise resolved? true response.ok: false response.status: 404
Q3: How can I add more features to this project?
Here are extension ideas ranked by difficulty:
- Easy: Add a 5-day forecast using
/forecastendpoint, show date/time of data update - Medium: Auto-detect user location with
navigator.geolocation, save recent searches tolocalStorage, add temperature unit toggle (°C/°F) - Advanced: Add weather maps using Leaflet.js, implement autocomplete for city names, add offline support with Service Workers
// Example: Save last searched city
function saveLastCity(city) {
  localStorage.setItem('lastCity', city);
  console.log('Saved to localStorage:', city);
}

function loadLastCity() {
  const saved = localStorage.getItem('lastCity');
  console.log('Loaded from localStorage:', saved);
  return saved;
}

saveLastCity('Bangalore');
loadLastCity();Saved to localStorage: Bangalore Loaded from localStorage: Bangalore
🎉 Congratulations! You've built a complete Weather App that demonstrates real-world JavaScript skills — API integration, async programming, DOM manipulation, and error handling. These patterns apply to any API-driven frontend project.
Exam Focus
Revise definitions, diagrams, examples, and short-answer points for JavaScript Weather App Project — Fetch API & DOM Complete Tutorial 2026.
Interview Use
Prepare one clear explanation, one practical example, and one common mistake for this JavaScript Master Course topic.
Search Terms
javascript-complete-guide, javascript master course, javascript, complete, guide, mini, projects, weather
Related JavaScript Master Course Topics