JavaScript Notes
Learn to build a QR code scanner in JavaScript using the device camera with jsQR library, file upload fallback, decoded result display, and link detection.
What You'll Learn
- How to access the device camera with
getUserMedia() - How to read video frames onto a Canvas using
drawImage() - How to decode QR codes from canvas pixel data using jsQR
- How to support file upload as a fallback (scan from image)
- How to detect URLs in the decoded result and make them clickable
Project Overview
The QR scanner streams the camera feed into a <video> element, repeatedly draws frames to an off-screen canvas, extracts pixel data, and passes it to the jsQR library which returns the decoded string if a QR code is found.
Component Structure
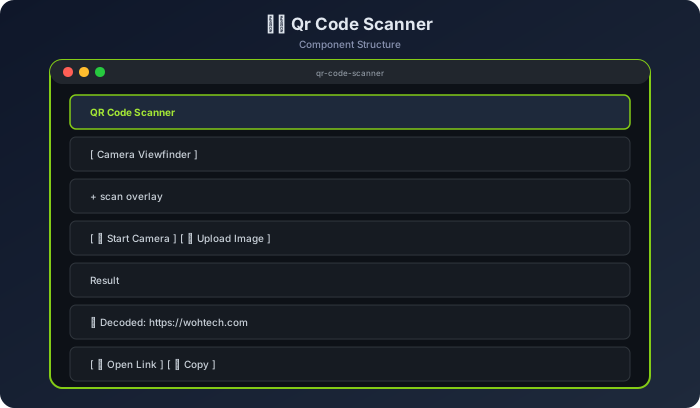
How It Works — Flow Diagram
Step-by-Step Build
Step 1 — Load jsQR
<script src="https://cdn.jsdelivr.net/npm/jsqr@1.4.0/dist/jsQR.js"></script>Step 2 — HTML Structure
<div class="scanner-app">
  <h1>QR Code Scanner</h1>

  <div class="scanner-viewport">
    <video id="video" class="scanner-video" playsinline></video>
    <canvas id="canvas" class="scanner-canvas hidden"></canvas>
    <div class="scan-overlay">
      <div class="scan-box"></div>
    </div>
    <div id="scanStatus" class="scan-status">Waiting to scan...</div>
  </div>

  <div class="scanner-controls">
    <button id="startBtn"  class="btn-start">📷 Start Camera</button>
    <button id="stopBtn"   class="btn-stop  hidden">⏹ Stop</button>
    <label  class="btn-upload">
      🖼 Upload Image
      <input type="file" id="fileInput" accept="image/*" hidden>
    </label>
  </div>

  <div id="resultSection" class="result-section hidden">
    <h3>Decoded Result</h3>
    <div id="resultText" class="result-text"></div>
    <div class="result-actions">
      <a id="openLink" class="btn-open hidden" target="_blank">🔗 Open Link</a>
      <button id="copyResult" class="btn-copy">📋 Copy</button>
    </div>
  </div>
</div>
Step 3 — Start Camera Stream
const video  = document.getElementById("video");
const canvas = document.getElementById("canvas");
const ctx    = canvas.getContext("2d");

let stream      = null;
let scanning    = false;
let animFrameId = null;

async function startCamera() {
  try {
    stream = await navigator.mediaDevices.getUserMedia({
      video: { facingMode: "environment", width: 640, height: 480 }
    });
    video.srcObject = stream;
    await video.play();
    scanning = true;
    setStatus("🔍 Scanning...");
    requestAnimationFrame(scanLoop);
    document.getElementById("startBtn").classList.add("hidden");
    document.getElementById("stopBtn").classList.remove("hidden");
  } catch (err) {
    setStatus(`❌ Camera error: ${err.message}`);
  }
}
Step 4 — Scan Loop
function scanLoop() {
  if (!scanning) return;

  if (video.readyState === video.HAVE_ENOUGH_DATA) {
    canvas.width  = video.videoWidth;
    canvas.height = video.videoHeight;
    ctx.drawImage(video, 0, 0, canvas.width, canvas.height);

    const imageData = ctx.getImageData(0, 0, canvas.width, canvas.height);
    const code = jsQR(imageData.data, imageData.width, imageData.height, {
      inversionAttempts: "dontInvert"
    });

    if (code) {
      scanning = false;
      stopCamera();
      displayResult(code.data);
      return;
    }
  }

  animFrameId = requestAnimationFrame(scanLoop);
}
Step 5 — Stop Camera
Step 6 — Display Result
function displayResult(text) {
  document.getElementById("resultSection").classList.remove("hidden");
  document.getElementById("resultText").textContent = text;
  setStatus("✅ QR code decoded!");

  // Detect URL
  const isUrl = /^https?:\/\//i.test(text);
  const openLink = document.getElementById("openLink");
  if (isUrl) {
    openLink.href = text;
    openLink.classList.remove("hidden");
  } else {
    openLink.classList.add("hidden");
  }
}
Step 7 — File Upload Fallback
Step 8 — Copy to Clipboard
Step 9 — Wire Buttons
document.getElementById("startBtn").addEventListener("click", startCamera);
document.getElementById("stopBtn").addEventListener("click", stopCamera);
Console Output
startCamera()
→ navigator.mediaDevices.getUserMedia({ video: ... })
→ stream acquired → video.play()
→ requestAnimationFrame(scanLoop) started

scanLoop() cycle 1: video not ready yet → next frame
scanLoop() cycle 42: QR code found!
code.data = "https://wohtech.com"
→ stopCamera() called
→ displayResult("https://wohtech.com")
→ "Open Link" button visible

// File upload: user selects qr-image.png
img.onload → jsQR(imageData, 800, 600)
→ code.data = "WIFI:T:WPA;S:HomeNet;P:secret;;"
→ displayResult("WIFI:T:WPA;S:HomeNet;P:secret;;")
→ Not a URL → Open Link button hidden
Edge Cases to Handle
| Situation | Expected Behavior |
|---|---|
| Camera permission denied | Show error message, offer file upload |
| No QR in uploaded image | "No QR code found" status |
| Low light / blurry | inversionAttempts: "attemptBoth" helps |
| Non-URL decoded text | Open Link button hidden |
| Multiple QRs in frame | jsQR returns the first one found |
Challenge Yourself
- Continuous mode — don't stop after the first scan; keep scanning and show a history
- Torch/flashlight — toggle the camera's torch using
MediaTrackConstraints - Scan corner markers — draw corner dots on the canvas where jsQR found the QR
- Barcode support — add Barcode Detection API support for standard barcodes
- Sound feedback — play a beep when a code is successfully decoded
Best Practices
- Use
facingMode: "environment"for the back camera on mobile (better for scanning) - Always call
stream.getTracks().forEach(t => t.stop())when done — don't leave the camera on - Use
requestAnimationFrameinstead ofsetIntervalfor the scan loop — it syncs to screen refresh - The jsQR library works with raw pixel data (
Uint8ClampedArray) — passimageData.data - File upload fallback is essential — not all users want to grant camera access
Exam Focus
Revise definitions, diagrams, examples, and short-answer points for Build a JavaScript QR Code Scanner - Step by Step Project Tutorial.
Interview Use
Prepare one clear explanation, one practical example, and one common mistake for this JavaScript Master Course topic.
Search Terms
javascript-complete-guide, javascript master course, javascript, complete, guide, mini, projects, code
Related JavaScript Master Course Topics